| This document is Work in Progress. The given information should be correct, but some things are still missing. |
Introduction
TODO: functional approach
If you want to use the framework you should already be familiar with writing missions for EE.
Getting Started
Checkout this repo into the scripts folder of your EE installation or just download the zip from
Github and extract.
-- Name: Hello Lively Epsilon
-- Description: Testing Lively Epsilon
-- Type: Mission
require "lively_epsilon/init.lua"
function init()
    -- add your code here
end

function update(delta)
    Cron.tick(delta)
end
If you like, you can still put code into the update function, but typically you do not
need to do that, because Lively Epsilon is using Cron to perform checks and updates that
you would usually put there. Your code usually ends up in the init function.
If not indicated otherwise all example code will have to be put into the init function.
Building Blocks
Cron
Cron works as a scheduler for functions. It is capable of calling functions after a specified
time and calling functions regularly at a specified interval. This is what you typically do
in the update function, but you are more flexible and you can configure how often your
function should be called.
regular
- Basic usage
Cron.regular(function()
    if not station:isValid() then
        -- you won
        victory("Human Navy")
    end
end)
If you got an operation that is expensive or does not make sense to execute too often you can give an interval.
- A check that is done once a second
Cron.regular(function(self)
    if distance(player, station) > 20000 then
        player:addToShipLog("You did not guard the station as you were supposed to.")
        victory("Kraylor")
    end
end, 1)
There is an optional third parameter that gives the initial delay. This specifies how many seconds after creation the function is called for the first time.
once
- Basic usage
Cron.once(function()
    station:sendCommsMessage(player, "Do not forget my assignment.")
end, 60)
aborting crons
It is possible to abort crons from within and outside the function.
The callback function gets itself as the first parameter. It can be used to abort the currently running cron.
Cron.regular(function(self)
    if player:isDocked(station) then
        Cron.abort(self)
    end
end, 60)
You could also decide to give your cron a fixed name. This way you can stop the cron from anywhere.
Cron.once("timeout", function()
    player:addToShipLog("You were not fast enough.")
    victory("Kraylor")
end, 5 * 60)
Cron.regular(function(self)
    if player:isDocked(station) then
        Cron.abort("timeout")
        Cron.abort(self)
    end
end)| A cron will be overridden if one by the same name already exists. This is intended behavior. So you need to make sure that your name is unique. |
To prevent colliding names Cron returns a unique one for you if none is given. You can also
use that to stop a different cron.
local cronId = Cron.once(function()
    player:addToShipLog("You were not fast enough.")
    victory("Kraylor")
end, 5 * 60)
Cron.regular(function(self)
    if player:isDocked(station) then
        Cron.abort(cronId)
        Cron.abort(self)
    end
end)
Measuring time
Empty Epsilon does not give any guarantee on how many frames are rendered per second. You need to keep that in mind when working with time.
delta
You get a delta as the second argument or the callback function. This is always the time that passed since the callback was called the last time or – if it is called for the first time – since it was created.
Here is a simple way to have nanobots repair your ships hull.
- Implementing nanobots
local repairPerSecond = 2
Cron.regular(function(self, delta)
    local hull = player:getHull() + delta * repairPerSecond
    player:setHull(hull)
    if hull > player:getHullMax() then
        Cron.abort(self)
    end
end)
now
You can get the current game time in game in seconds using now()
print("It is now " .. Cron.now())| This is a rough time and will probably diverge with the time of the clock on your wall. |
manipulate delays
You can manipulate delays to postpone their execution using addDelay.
Cron.once("timeout", function()
    player:addToShipLog("You were not fast enough.")
    victory("Kraylor")
end, 5 * 60)
Cron.regular(function(self)
    if distance(player, 1000, 2000) < 500 then
        player:addToShipLog("You reached the waypoint and got 30 bonus seconds.")
        Cron.addDelay("timeout", 30)
        Cron.abort(self)
    end
end)
You can also read the time that has to pass until the function is called for the next time with getDelay.
Cron.once("timeout", function()
    player:addToShipLog("You were not fast enough.")
    victory("Kraylor")
end, 5 * 60)
Cron.regular(function(self)
    player:addToShipLog(string.format("Hurry up! Only %0.1f seconds left.", Cron.getDelay("timeout")))
end, 10)
EventHandler
An EventHandler is a well-known concept from programming that allows to loosely couple your code. You can have several independent functions listening to the same event, but they do not need to know or even care about one another.
The terminology is that a function "registers" to listen for an event and is called as soon as the event is "fired".
local eh = EventHandler:new()
eh:register("newPlayer", function(thePlayer)
    thePlayer:addToShipLog("Hello World.")
end)
eh:register("newPlayer", function(thePlayer)
    local x,y = thePlayer:getPosition()
    CpuShip():setFaction("Kraylor"):setPostion(x + 4000, y):orderAttack(thePlayer)
end)

Cron.regular(function()
    if not player:isValid() then
        player = PlayerSpaceship():setCallSign("Reborn")
        eh:fire("newPlayer", player)
    end
end)
In the example the cron at the bottom has just one job: Recreating the player ship if it got destroyed. All the other logic that happens afterwards is done in the event listeners.
You can see in the example that you can give a single argument to the fire method that will
be passed through to the event listeners.
|
You need to be aware that the argument is given to the event listeners by reference. This means that all changes you do to that parameter are permanent and available in successive event listeners. You can use that to your advantage. But you should be aware that you alway need to check your inputs. |
config.allowedEvents
The problem with the event names is that you could mistype some of them. This leads to confusion because you have set the event listener, but it will never be called.
This is why the allowedEvents config exists. You can use it configure a list of event names that
are known to be correct. If you try to register or fire an event with a name that is not in that list
it will fail with an error.
local eh = EventHandler:new({
    allowedEvents = {"foo", "bar"}
})
eh:register("bar", function() --[[ your code goes here]] end) -- this works

eh:register("baz", function() --[[ your code goes here]] end) -- this will fail with an error

eh:fire("bar") -- this works
eh:fire("baz") -- this will fail with an error
config.unique
By default you can call events as often as you like, but if you want to use one event handler for
running your main story, the unique config option might come in handy.
It guarantees that every event is only called once and issues warnings if a listener is registered after the event is called or if an event should be called a second time.
local eh = EventHandler:new({ unique = true })
eh:register("bar", function() --[[ your code goes here]] end)
eh:fire("bar") -- this works
eh:register("bar", function() --[[ your code goes here]] end) -- this will cause a warning
eh:fire("bar") -- this will cause a warning
priorities
By default all events are called in the order they have been registered. Typically it is
a good rule of thumb to write Event Listeners in a way that their order does not matter,
but in some cases there is no easy way around. That is why you can specify a priority when
registering an event. The default value is 0 and the lower the number is the earlier
the listener is called.
local eh = EventHandler:new()
eh:register("count", function() print("2") end)
eh:register("count", function() print("3") end, 10)
eh:register("count", function() print("1") end, -10)

eh:fire("count") -- will print "123"
Translator
The Translator helps you writing your scenarios independent of the players spoken language.
You can register translations for labels and then translate them.
local translator = Translator:new()
translator:register("say_hi", "Hello World")
translator:register({
    say_hi_to_foo = "Hello Foo",
    say_hi_to_bar = "Hello Bar",
})

translator:translate("say_hi") -- returns "Hello World"
translator:translate("say_hi_to_foo") -- returns "Hello Foo"
Translations can also be functions. They will be called with the additional parameters
that are given to the translate method.
local translator = Translator:new()
translator:register("say_hello", function(name)
    return "Hello " .. name
end)

translator:translate("say_hello", "Bob") -- returns "Hello Bob"| When working with functions it is always advised to think of them as atomic functions.[1] Having helper functions extracted is of course fine. But they should not include business logic or have to anything about global state. |
| Missing labels or failing translation functions will not break the business logic of your code. They will return the translation key. This is to ensure that a scenario does not fail in one locale but not the other because a translation is faulty. |
multiple locales
So far we have only used one locale. There is a default locale that has the identifier "en" for some mysterious reason. All translations are registered and translated from "en" unless you give a different key as the first argument.
You can use the useLocale function to change the default locale when the translate method is called.
local translator = Translator:new()
translator:register("say_hello", function(name)
    return "Hello " .. name
end)
translator:register("de", "say_hello", function(name)
    return "Hallo " .. name
end)

translator:translate("say_hello", "Bob") -- returns "Hello Bob"

translator:useLocale("de")
translator:translate("say_hello", "Bob") -- returns "Hallo Bob"
useLocale can also use fallback locales in case there is no label in the given locale.
local translator = Translator:new()

translator:register("en", "one", "One")
translator:register("en", "two", "Two")
translator:register("de", "one", "Eins")

translator:useLocale("de", "en")
translator:translate("one") -- returns "Eins"
translator:translate("two") -- returns "Two"
Components
OrderQueue
The OrderQueue Component allows to chain commands for Ships and Fleets. So instead of giving just one order, you can issue multiple orders that are executed consecutively.
This makes it easy to issue complex commands or define patrol routes.
local ship = CpuShip():setFaction("Human Navy")
local homeBase = SpaceStation():setFaction("Human Navy")
local enemyBase = SpaceStation():setFaction("Kraylor")
Ship:withOrderQueue(ship)

ship:addOrder(Order:defend(10000, 0, {
    range = 20000,
    minClearTime = 30,
}))
ship:addOrder(Order:attack(enemyBase))
ship:addOrder(Order:dock(homeBase))
ship:addOrder(Order:flyTo(5000, 0))
As with other orders issued to Fleets, they will carry out the order even if the Fleet Leader was destroyed.
| As GM you can issue different commands to ships with an active OrderQueue. They will follow your command and take on they reached their objective or you reset them by giving them the order to idle. |
Every Order allows you to specify the three callbacks onExecution, onCompletion and onAbort as optional
configuration. They get the order as first argument and the Ship or Fleet executing the order as second
parameter.
onAbort is called when the current order can no longer be executed. This can happen if a ship is ordered to
dock at a station, but the station is destroyed. It gets the Ship or Fleet as third parameter and a string
with the reason as second argument.
Every Order can also have an delayAfter configuration. It waits the specified amount of seconds before
executing the next Order after completing the current order.
- Using the callbacks it is rather easy to let a ship patrol between two points
local ship = CpuShip()
Ship:withOrderQueue(ship)
ship:setPosition(0, 0)

ship:addOrder(Order:flyTo(5000, 0, {
    onCompletion = function(self, ship) ship:addOrder(self) end,
}))
ship:addOrder(Order:flyTo(-5000, 0, {
    onCompletion = function(self, ship) ship:addOrder(self) end,
}))
flyTo
Makes a ship fly to a specific coordinate.
local ship = CpuShip():setFaction("Human Navy")
Ship:withOrderQueue(ship)
ship:addOrder(Order:flyTo(10000, 0, {
    minDistance = 1000
}))
ship:addOrder(Order:flyTo(0, 10000, {
    minDistance = 1000
}))
ship:addOrder(Order:flyTo(-10000, 0, {
    minDistance = 1000
}))
As configuration you can set a minDistance. This sets the radius that the ship should be around the
target zone so the Order is considered done.
If ignoreEnemies is set to true the ship will not attack enemies on the way to the target location.
Read more on this topic in the Reference and the Specification.
dock
This order makes a Ship or Fleet dock to a station, refill its weapons, recharge its shields and repair any hull damage.
local ship = CpuShip():setFaction("Human Navy")
local station = SpaceStation():setFaction("Human Navy")
Ship:withOrderQueue(ship)

ship:addOrder(Order:dock(station))
Read more on this topic in the Reference and the Specification.
attack
This lets a Ship or Fleet attack a target until it is destroyed.
local ship = CpuShip():setFaction("Human Navy")
local station = SpaceStation():setFaction("Kraylor")
Ship:withOrderQueue(ship)

ship:addOrder(Order:attack(station))
Read more on this topic in the Reference and the Specification.
defend
Let a Ship or Fleet defend a location, a target or the current location.
local ship = CpuShip():setFaction("Human Navy")
local station = SpaceStation():setFaction("Human Navy")
Ship:withOrderQueue(ship)

ship:addOrder(Order:defend(station))
ship:addOrder(Order:defend(10000, 0))
ship:addOrder(Order:defend())
The configuration can tweak the Order. The Ship will consider the task complete when there are no enemies
in range for the last minClearTime seconds.
This does not mean that the ship will attack those enemies in range. It is still the AI that will
take care of target selection.
|
The configuration option minDefendTime gives the time that the ship will defend the location even if there
have never been enemies anywhere around.
Read more on this topic in the Reference and the Specification.
use
Make a Ship or Fleet take a WormHole. This is rather straight forward for ships, but the behavior is
more complex for Fleets. The ships will jump to the target on their own, but wait on the other side
until all ships have arrived.
local ship = CpuShip():setFaction("Human Navy")
local ship2 = CpuShip():setFaction("Human Navy")
local ship3 = CpuShip():setFaction("Human Navy")
local wormHole = WormHole():setPosition(10000, 0):setTargetPosition(99999, 0)

local fleet = Fleet:new({ ship, ship2, ship3 })
Fleet:withOrderQueue(fleet)

fleet:addOrder(Order:use(wormHole))
fleet:addOrder(Order:flyTo(99999, 99999))
There is a point right in front of the WormHole, where the ships will break up their formation to fly into the
WormHole. The configuration callback onBreakUp will be called at that moment.
Read more on this topic in the Reference and the Specification.
Comms
The Comms Component allows to describe communication screens.
local ship = CpuShip()
Ship:withComms(ship)
ship:setHailText("How can we help you?")
ship:addComms(Comms:newReply("Who are you?", Comms:newScreen("We are a ship of the Human Navy.")))
setHailText sets the text the ship or station "says" when the player contacts them. With addComms you
can add new Replies that the players can click. Comms:newReply takes three arguments – only the first one
is mandatory. The first argument is the Label (aka "the thing the players say"), the second a Screen that
will be shown when this reply is selected. If you leave the second argument out the main screen will be shown
when this reply is selected. The third argument is a function that gets the Comms, the hailed ship and the player
as arguments and should return true if this reply should be displayed.
- The first two arguments can also be functions
local station = SpaceStation()
Station:withComms(station)

station:setHailText(function(comms_target, comms_source)
    return "Hello " .. comms_source:getCallSign() .. ". This is " .. comms_target:getCallSign() .. ". How can we help?"
end)

station:addComms(Comms:newReply(
    function(comms_target, comms_source) -- what player says
        if comms_target:getHull() < comms_target:getHullMax() then
            return "Your station took damage. What is your status?"
        else
            return "What is your status?"
        end
    end,
    function(comms_target, comms_source) -- next screen
        if comms_target:areEnemiesInRange(10000) then
            return Comms:newScreen("We are currently under attack.")
        else
            return Comms:newScreen("There are no attackers near by.")
        end

    end,
    function(comms_target, comms_source) -- condition
        return comms_source:isDocked(comms_target)
    end
))
The Comms:newScreen function allows you to create nested communications. Here is a complex snippet
to create a "Guess a number" game in comms
local station = SpaceStation()
Station:withComms(station)

local solution = math.random(1,10)

local correctGuessScreen = function()
    station:removeComms("guess_game")
    return Comms:newScreen("Yes, that was my number. You have won.")
end

local function wrongGuessScreen(number)
    return function()
        local screen = Comms:newScreen()
        screen:addText("No, " .. number .. " is not the number I was thinking of. Guess again.")

        for i=1,10 do
            if i == solution then
                screen:addReply(Comms:newReply(string.format("Is it %d?", i), correctGuessScreen))
            else
                screen:addReply(Comms:newReply(string.format("Is it %d?", i), wrongGuessScreen(i)))
            end
        end

        return screen
    end
end

station:addComms(Comms:newReply("I want to play a game", function()
    local screen = Comms:newScreen("Can you guess my number?")

    for i=1,10 do
        if i == solution then
            screen:addReply(Comms:newReply(string.format("Is it %d?", i), correctGuessScreen))
        else
            screen:addReply(Comms:newReply(string.format("Is it %d?", i), wrongGuessScreen(i)))
        end
    end

    return screen
end), "guess_game")
Read more on Comms:newScreen and Comms:newReply this topic in the Reference and the Specification.
Tools.ensureComms
One issue when initiating comms from a script is that you never know if the players are currently
involved in a different communication. Tools:ensureComms make sure the players at least have
the choice to accept or decline a communication once. It does not ensure that the message is read
(use Tools.storyComms if you need that), but it has to be intentionally ignored.
local station = SpaceStation()
Station:withComms(station)
station:setHailText("Hello World")
local player = PlayerSpaceship()

Tools:ensureComms(station, player)

-- ... or ...

Tools:ensureComms(station, player, "We have a special delivery for I. C. Weiner.")
Read more on Tools:ensureComms` in the Reference and the Specification.
Tools.storyComms
To make sure a conversation is not skipped use Tools:storyComms. The players are not able to
ignore the communication as it will pop up over and over again. The conversation could be rather
complex and span multiple screens. When the crew aborts the conversation they will have to start again
from the beginning. To mark the conversation as "finished", call Tools:endStoryComms in the final screen(s).
It is intended for story relevant conversations that should not be skipped.
local station = SpaceStation()
Station:withComms(station)
local player = PlayerSpaceship()

local comms = Comms:newScreen("Help us, almighty player! We are attacked.")
comms:addReply(Comms:newReply("We are on our way", function()
    Tools:endStoryComms()
    return Comms:newScreen("Thanks")
end))

Tools:storyComms(station, player, comms)| Take into consideration that players can abort the conversation and start over again. This could potentially lead to exploids if there is a screen in the conversation that gives the players something valuable. There is no guarantee it is not called multiple times. |
Read more on Tools:storyComms` in the Reference and the Specification.
Menu
The Menu is a powerful component to build menu-like structures using the custom buttons that can be added through the API. It can be used to create sub-menus and paginate long lists of buttons making it feasible to have a dynamic number of buttons.
local player = PlayerSpaceship():setPosition(0, 0)
Player:withMenu(player)

CpuShip():setCallSign("Nostromo"):setPosition(1000, 0)
CpuShip():setCallSign("Planet Express Ship"):setPosition(2000, 0)
CpuShip():setCallSign("Discovery"):setPosition(3000, 0)

player:addScienceMenuItem("ships", Menu:newItem("Ships", function()
    local submenu = Menu:new()
    submenu:addItem(Menu:newItem("Ships"))
    for _, ship in pairs(player:getObjectsInRange(30000)) do
        if ship.typeName == "CpuShip" and ship:isValid() then
            submenu:addItem(Menu:newItem(ship:getCallSign(), function()
                return ship:getDescription()
            end))
        end
    end
    return submenu
end))| The menus do not live-update. The list of close ships does not automatically update without player interaction. They need to go back to the main menu and click the "Ships" button again to see an updated list of ships. |
Back Button
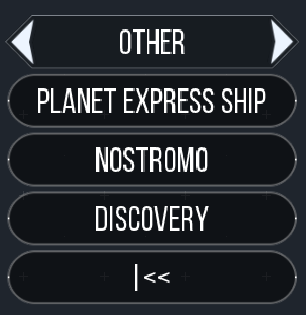
The Menu Component will always add a back button (|<<) to submenus that leads to the main menu.
This is to prevent a dead-lock situation where the player is not able to return to the main menu, because
a submenu does not have a back button.
You can change the label of the back button for all menus by using the backLabel configuration:
local player = PlayerSpaceship()
Player:withMenu(player, {
    backLabel = "Back",
})
Sorting
By default the menu entries are sorted by the order they are added to the menu. But you can set
a priority on the menu items. Their default priority is 0. Setting a lower number will move the item
to the top, a higher number will move it to the bottom.
local player = PlayerSpaceship():setPosition(0, 0)
Player:withMenu(player)

player:addHelmsMenuItem("world", Menu:newItem("World"))
player:addHelmsMenuItem("hello", Menu:newItem("Hello"), -10)
Pagination
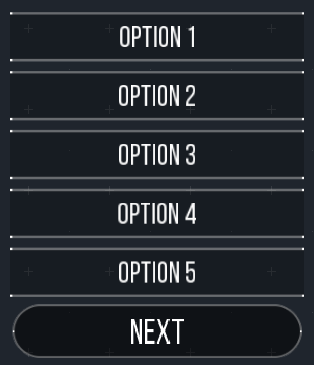
Long menus are automatically paginated to prevent the buttons from overflowing the screen.
local player = PlayerSpaceship()
Player:withMenu(player)
for i=1,25 do
    player:addWeaponsMenuItem("option_" .. i, Menu:newItem("Option " .. i, i))
end
The Menu Component tries to play nicely with custom buttons that have been added to the stations
without the Menu Component. They will always stay visible, but as they reduce the slots that the
menu component can utilize you should set the itemsPerPage configuration to a lower number. It
determines how many slots the Menu Component is allowed to fill at most per station.
You can also change the labels of the "Next" and "Previous" buttons.
local player = PlayerSpaceship()
Player:withMenu(player, {
    labelNext = "Next",
    labelPrevious = "Previous",
    itemsPerPage = 6,
})
Menus for GM
Quick Dial
Quick Dial shows the relay station a number of targets that they can open a connection to without having to select the target on the map.
local player = PlayerSpaceship():setPosition(0, 0)
Player:withMenu(player, { backLabel = "Back" })
Player:withQuickDial(player, { label = "Quick Dial" })

local ship = CpuShip():setCallSign("Nostromo"):setPosition(1000, 0)
local station = SpaceStation():setCallSign("Outpost 42"):setPosition(2000, 0)
local fleet = Fleet:new({
    CpuShip():setCallSign("Discovery"):setPosition(3000, 0)
})

player:addQuickDial(ship)
player:addQuickDial(station)
player:addQuickDial(fleet)
Even though invalid targets are automatically not displayed it is also possible to remove targets explicitly.
player:removeQuickDial(ship)Read more on Quick Dial in the Reference and the Specification.
Missions
In its basic form a Mission is nothing more than a state machine that keeps track in what state
a mission is (started, failed, successful) and prevents transitions that would not make sense (a
failed mission can not become successful or be started again).
These are all possible states and their transitions:
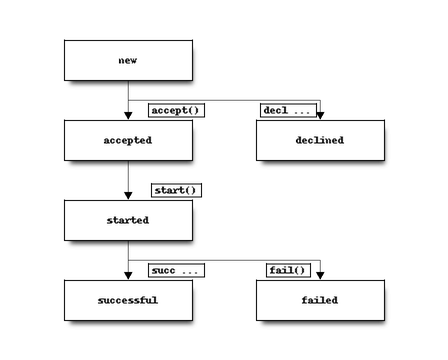
When creating a mission, you can add callbacks that are called when the mission changes state. As there are no loops in the state transitions, it is guaranteed that every callback will be called one time at most:
local mission = Mission:new({
    onStart = function()
        print("The mission was started.")
    end,
    onSuccess = function()
        player:addToShipLog("Mission successful")
    end,
})
The callback onEnd is special in the regards that it will be called as soon as the mission is
successful or has failed.
Read more on Missions in the Reference and the Specification.
Combining missions
Mission:chain() combines multiple missions in a daisy chain: The next mission is started as soon
as the previous is successful. In case any sub mission fails the whole chain of missions fail.
local subMission1 = Mission:new({})
local subMission2 = Mission:new({})

local mission = Mission:chain(subMission1, subMission2)

mission:accept()
-- this starts subMission1
mission:start()

-- this will start subMission2
subMission1:success()

-- this will mark the mission as successful
subMission2:success()
Read more on Mission:chain() in the Reference and the Specification.
Mission:allOf() needs to finish all the sub missions. They are all started at the same time and
can be finished in any order. Should any of them fail, then the whole mission fails.
local subMission1 = Mission:new({})
local subMission2 = Mission:new({})

local mission = Mission:allOf(subMission1, subMission2)

mission:accept()
-- this starts subMission1 and subMission2
mission:start()

-- this will not yet finish the mission
subMission1:success()

-- this will mark the mission as successful
subMission2:success()
Read more on Mission:allOf() in the Reference and the Specification.
Apart from that, missions created with Mission:chain() and Mission:allOf() behave the same way
as missions created with Mission:new(): You can add event listeners to it, traverse the states
and apply any of the mission traits.
Mission Traits
There are multiple traits that can modify the way a mission works.
Mission:forPlayer
A mission could be bound to a player. This can be done with Mission:forPlayer. Such a mission
will automatically be added to the Mission Tracker of the player (if the player ship has it) and the mission
will automatically fail if the player is destroyed.
local player = PlayerSpaceship()
local mission = Mission:new()
Mission:forPlayer(mission, player)
Read more in the Reference and the Specification.
Mission:withBroker
When missions are given by someone Mission:withBroker comes into play. It also allows to give
the mission a humanly readable title, a description and set hints.
The mission will automatically fail if the broker is destroyed.
local station = SpaceStation()
local mission = Mission:new()
Mission:withBroker(mission, "Title of the mission", {
    description = "Help " .. station:getCallSign() .. " solve their problems",
    missionBroker = station
})
Read more in the Reference and the Specification.
Mission:withTimeLimit
Missions can have a time limit. If it is exceeded the mission fails automatically. The timer will start as soon as the mission is started.
local station = SpaceStation()
local mission = Mission:new()
Mission:withTimeLimit(mission, 600) -- in seconds
Read more in the Reference and the Specification.
Mission Tracker & Display
Predefined missions
Upgrade
Upgrade Broker & Comms
Upgrade Tracker & Display
PlayerSpaceship Storage
Storage Tracker
Crew
Ship Events
Fleet
A Fleet allows to group ships together and let them fly in formation.
Via scripts you can issue orders to fleets. If the fleet leader is destroyed the next ship will pick up the lead and continue executing the given order.
This works the same way when the GM gives orders to the leader ship. If the leader is destroyed the next ship will take over the order.
As GM you can issue different orders to the wingmen. They will execute these
until you give them the orderIdle and they will fly back in formation.
|
local fleet = Fleet:new({ship1, ship2, ship3})

fleet:orderFlyTowards(1000, 0)
ship2:orderAttack(enemy) -- wingman will attack the enemy
ship2:orderIdle() -- wingman will fly back into formation

if fleet:isValid() then
    fleet:getLeader():destroy()
    -- ship2 will take over the lead and will fly to the next waypoint
end
Tags
Tags are a generic concept to apply to any object. You can add and remove tags without the need of adding multiple attributes.
local ship = CpuShip()
Ship:withTags(ship, "fighter")
ship:addTag("blue")
ship:removeTag("fighter")

local person = Person:byName("John")
Generic:withTags(person)
person:addTag("male")

if person:hasTag("male") then
    print("Hello Mr. " .. person:getFormalName())
else
    print("Hello Mrs. " .. person:getFormalName())
end
It works with any object.
local object = {
    title = "Foobar",
    message = "Hello World",
}
Generic:withTags(object)
object:addTag("english")
Products
A product is a representation of something that can be bought, sold, produced or loaded and is used in multiple places in Lively Epsilon.
It is fairly easy to create a new product.
local ore = Product:new("Iron Ore", {
    id = "ore",
    size = 4,
})
The size is of a product is only used for tracking the storage space need in a PlayerSpaceship. Bigger items
should have a bigger size.
Everything apart of the name is optional to make it easy to create unique products.
local mcguffin = Product:new("Mission Item")Read more on Products in the Reference and the Specification.
Storage
There are two concepts for defining storage inside Lively Epsilon. This describes the one that is used for
non-player ships. You can imaging the concept as "storage rooms": For every product there is a storage room
for this product only. If the station can not store any more of product A, it can still store product B,
because there is a different storage room for it.
This concept is also used for non-player spaceships.
Using the withStorageRooms function lets you define the maximum storage capacity.
local products = {
    power = Product:new("Energy Cell"),
    o2 = Product:new("Oxygen"),
    ore = Product:new("Iron Ore"),
}

local station = SpaceStation()
Station:withStorageRooms(station, {
    [products.power] = 1000,
    [products.o2] = 500,
})

local function printStorage(station, product)
    if station:canStoreProduct(product) then
        print(string.format(
            "Station stores %d/%d units of %s. There is space for %d more.",
            station:getProductStorage(product),
            station:getMaxProductStorage(product),
            product:getName(),
            station:getEmptyProductStorage(product)
        ))
    else
        print("Station can not store " .. product:getName() .. ".")
    end
end

printStorage(station, products.power)
printStorage(station, products.ore)

station:modifyProductStorage(products.power, 700)
printStorage(station, products.power)

-- will print:
-- Station stores 0/1000 units of Energy Cell. There is space for 1000 more.
-- Station can not store Iron Ore.
-- Station stores 700/1000 units of Energy Cell. There is space for 300 more.| Modifying a product storage beyond its minimum or maximum capacity does not cause any kind of error. It will just create products out of thin vacuum or make products disappear in an invisible pocket-sized black hole. This is to ease scripting for you and not having to take care of multiple error conditions. |
Read more on Storage in the Reference and the Specification.
Production
Stations with a storage can transform products into other products or even create products from nothing (like solar energy) or convert products into nothing (like used up energy).
local products = {
    power = Product:new("Energy Cell"),
    o2 = Product:new("Oxygen"),
}

local station = SpaceStation()
Station:withStorageRooms(station, {
    [products.power] = 1000,
    [products.o2] = 500,
})
-- give the station something to start with
station:modifyProductStorage(products.power, 1000)

Station:withProduction(station, {
    {
        productionTime = 30,
        consumes = {
            { product = products.power, amount = 10 }
        },
        produces = {
            { product = products.o2, amount = 10 },
        }
    },
})
The station will continue producing unless there are not enough resources or the storage of the product is full.
Combining this with the Merchant can help you create a simple economy that the players can help running.
Read more on Production in the Reference and the Specification.
Merchant & Comms
Having a storage is of course in itself not useful, but stations can have a merchant that buys or sells goods.
local products = {
    power = Product:new("Energy Cell"),
    o2 = Product:new("Oxygen"),
}

local station = SpaceStation()
Station:withStorageRooms(station, {
    [products.power] = 1000,
    [products.o2] = 500,
})

Station:withMerchant(station, {
    [products.power] = { buyingPrice = 1, buyingLimit = 420 },
    [products.o2] = { sellingPrice = 5, sellingLimit = 42 },
})

station:modifyProductStorage(products.power, 100)
station:modifyProductStorage(products.o2, 100)

local function printMerchant(station, product)
    if station:isBuyingProduct(product) then
        print(string.format(
            "Station buys a maximum of %d units of %s at a price of %d.",
            station:getMaxProductBuying(product),
            product:getName(),
            station:getProductBuyingPrice(product)
        ))
    elseif station:isSellingProduct(product) then
        print(string.format(
            "Station sells a maximum of %d units of %s at a price of %d.",
            station:getMaxProductSelling(product),
            product:getName(),
            station:getProductSellingPrice(product)
        ))
    end
end

printMerchant(station, products.power)
printMerchant(station, products.o2)

-- will print:
-- Station buys a maximum of 320 units of Energy Cell at a price of 1.
-- Station sells a maximum of 58 units of Oxygen at a price of 5.
Configuring buyingLimit and sellingLimit is optional. If left blank the station
will sell and buy all of its stock. In any other case it will only sell if it got
more than sellingLimit units in store and buy if it got less than buyingLimit units
in store.
Configuring the merchant will allow any non-enemy ship (including the player) to buy or sell from the station.
Read more on Merchants in the Reference and the Specification.
Merchant Comms
Traders
A trader is assigned to one station and buys one resource on behalf of the station from a different station. So what you need is a station that sells some product, a station that buys that product and a trader assigned to the second one.
local products = {
    power = Product:new("Energy Cell"),
}

local sellingStation = SpaceStation():setPosition(0, 0)
Station:withStorageRooms(sellingStation, {
    [products.power] = 1000
})
Station:withMerchant(sellingStation, {
    [products.power] = { sellingPrice = 1 },
})

local buyingStation = SpaceStation():setPosition(10000, 0)
Station:withStorageRooms(buyingStation, {
    [products.power] = 1000
})
Station:withMerchant(buyingStation, {
    [products.power] = { buyingPrice = 1 },
})

local ship = CpuShip():setPosition(11000, 0)
Ship:withStorageRooms(ship, {
    [products.power] = 1000,
})
Ship:behaveAsBuyer(ship, buyingStation, products.power)
This trader will try to find a station close to its home base buyer that sells power, buy it and bring
it back to its home station.
| Unlike economist nowadays, traders in Lively Epsilon are not trying to maximize their profits. They will just buy anything regardless of its price. |
Read more on Traders in the Reference and the Specification.
Miner
A miner is a ship that will seek out Asteroids close to its home base, mine them and unload the products at its home base.
local products = {
    ore = Product:new("Iron Ore"),
}

local factory = SpaceStation():setPosition(0, 0)
Station:withStorageRooms(factory, {
    [products.ore] = 1000
})

local ship = CpuShip():setPosition(1000, 0)
Ship:withStorageRooms(ship, {
    [products.ore] = 1000,
})
Ship:behaveAsMiner(ship, factory, function(asteroid, ship, station)
    return {
        [products.ore] = math.random(10, 50)
    }
end)
Using the callback you can determine which resources the miner finds when it has mined an asteroid. Products the ship or its home base can not store will be silently discarded.
Read more on Miners in the Reference and the Specification.
Chatter
Chatter is a component to wrap ambient noise and limit its range. You would typically not use it to relay
important information to the players but make the surrounding appear more alive. They will pop up in the log
of the Relay station. By default the range that Chatter is received is 1.5 times the radar range, but you
can change it with the maxRange option.
local chatter = Chatter:new({
    maxRange = 50000,
})

local ship = CpuShip()
chatter:say(ship, "Carpe Diem")
You typically do not need more than one Chatter object in your scenario. Except when you want to relay different
conversations at different distances.
The Chatter component is also able to send conversations.
local chatter = Chatter:new()

local ship1 = CpuShip()
local ship2 = CpuShip()
chatter:converse({
    {ship1, "Hey. What are you doing?"},
    {ship2, "Staring at the emptiness of space."},
    {ship1, "Wow. This sounds pretty boring."},
})
Every line of the conversation will be send with a slight delay depending on how long the actual line was. It should roughly match the reading speed of an average person. If one of the partners is destroyed, the conversation will be aborted. And if one the partners is out of range the players will just read part of the conversation.
Read more on Chatter in the Reference and the Specification.
Chat Noise & Chat Factory
Chat Noise is a concept to allow random chats around the universe that is not triggered by certain actions but randomly occurring to keep the players engaged. You can use it to entertain the crew or hide secret messages in it.
You can add multiple ChatFactories to ChatNoise that describe chats that the player could randomly
receive at certain intervals. Chats could only be run if there are a certain amount of Stations and Ships
close to the player.
Let’s start with a simple example by adding only one ChatFactory to our ChatNoise
local chatter = Chatter:new()
local noise = Chatter:newNoise(chatter)

noise:addChatFactory(Chatter:newFactory(1, function(stationOrShip) (1)
    return { (2)
        { stationOrShip, "I'm so bored. Nothing is happening..."},
    }
end))| 1 | The first parameter (1) denotes that the function expects one valid station or ship. |
| 2 | The return value is a valid object to be used as argument for the converse function. |
ChatterNoise selects a random CpuShip or SpaceStation in the vicinity of the player and gives
it as argument to the function.
It is also possible to have multiple participants in a conversation. This will select two distinct CpuShips
or SpaceStations and give it as arguments to the function.
noise:addChatFactory(Chatter:newFactory(2, function(stationOrShip1, stationOrShip2)
    return {
        { stationOrShip1, "I'm so bored. Nothing is happening..."},
        { stationOrShip2, "Wanna play some \"I spy with my little eye\"?"},
        { stationOrShip1, "Nah. I know you would pick black as space."},
    }
end))
To have more control over what is selected as arguments you can use the filter option and have a function
that returns true if the given argument is a valid candidate for the ChatFactory.
noise:addChatFactory(Chatter:newFactory(2, function(station, ship)
    return {
        { station, "Want to buy some engine oil from our station?"},
        { ship, "No thanks, I'm fine."},
    }
end, {
    filters = {
        function(thing) return isEeStation(thing) end,
        function(thing, station) return isEeShip(thing) and thing:isFriendly(station) end, (1)
    },
}))| 1 | filter functions get all other selected arguments as additional arguments in inverse order. |
This chat would only run if there are a CpuShip and a friendly SpaceStation close to the player.
Read more on ChatterNoise and ChatterFactory in the Reference and the Specification.